Friday, September 1, 2017

Fabric Organization, Part 2

In my previous post I shared how I organize scraps between 1/4 yard and 1/2 yard.

The rest is a bit of an experiment.

My larger pieces of fabric (> 1/2 yard) have always just been folded up and stored in a tote. I never even looked at them and, frankly, was pleasantly surprised at what I found when I started looking through them.
After some online research, I did the following:
I decided to "file" them. I ordered these magazine backing boards from Amazon.com. They're acid free and not too thick.


Next, I found these file storage bins on Target.com. They were kind of pricey but exactly what I needed.
(Interestingly enough, when you fold yardage twice along the width, it's around 11"!)
I know that yardage rolled onto cardboard sheets would get to be bigger than 8.5" x 11", so I needed bins with a little more volume. These are 11.19 inches H x 13.75 inches W x 17.5 inches L.
I also needed them to be clear-ish so I can see what's inside each bin without opening it.

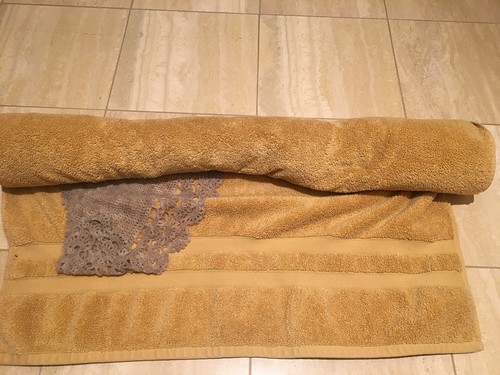
I folded each piece of fabric along the length one more time (since yardage is already folded once) and then rolled it onto a cardboard sheet as tightly as possible without bending the cardboard. Lastly I secured it with a pin.

As you can see, these fit quite nicely into the tote.

The most yardage I have on a sheet so far is around 6 yards and it's working just fine!
Up next, the small scraps.

Friday, August 4, 2017

Still here...and fabric organization

OMG! A blog post!
I tried using my iPad to post but Blogger doesn't seem to have an IOS app. Let me know if I'm wrong. I'm contemplating migrating the blog to Wordpress.

Anyhow, in the mean time I'm trying to get a hold on my personal fabric stash. I don't have a whole lot since I have a store full of bolts to choose from and I feel guilty buying fabric, but that will hopefully change in the (fairly) near future.
It's more about being pro-active. I'll be saving some yardage of my favorite fabrics in the store before it all sells out. And I'll probably be saving my scraps more religiously since I won't be getting fabric at wholesale prices any more.

I've divided my fabric into 3 categories:
A. Yardage - more than 1/2 yard
B. Smaller pieces between around 1/4 yard and 1/2 yard
C. Anything smaller than 1/4 yard

I've always mostly had control of B.

I fold the fabric around the short side of my 6" x 12" ruler and two rows fit neatly in these 15 quart Sterilite bins I got at Target.
I've had them for years and they still have them, which is a minor miracle since usually, when I want a couple more of a specific tote, they've changed the design.

All color coded!

In my next post I'll talk about my organization choices for the little scraps and the big pieces.

Oh, and all 30's Reproduction fabrics are 30% OFF for the next week!

Friday, February 3, 2017

Heart to Heart Runner Quilting

I've had a couple of questions regarding the quilting design on the Heart to Heart Runner, so I thought I'd share the process I went through. I'm pretty new to any quilting other than stippling, so this was a fun process.
Heart to Heart Valentine's Runner
First I have to say that I use Pinterest A LOT for inspiration and had seen something like this over there, so this is not an entirely novel idea.

I printed a diagram of the finished runner from the pattern.


I knew that I wanted to echo quilt around the hearts so, using good old tracing paper, I traced the hearts and added an echo line around each of them. (Ignore the "swirly" bits. That was my first, unsuccessful attempt at the design.)

On another piece of tracing paper, I traced the outline of the quilt, then removed that paper and just free-handed some lines. I think my previous experiments with Zentangles helped a little here.

Next, I overlayed this design over the previous tracing of the hearts, put a blank sheet of tracing paper over the top and traced everything. I then erased the bits where the lines went into the hearts, and adding a second line to the swirly design.

After this I marked the quilt top loosely resembling this design. I did not scale it up or anything, just kind of tried to duplicate it.

As for the actual quilting, I quilted the hearts in the ditch, then echoed about 1/4" away. After this I quilted the swirls following the lines I had drawn on the quilt top.

Next I randomly picked some filler designs (thanks Pinterest!) and filled the blank spaces. I tried to do it in somewhat of a logical fashion so it would look like everything flowed but I wasn't too scientific about it.

Lastly, I felt that the hearts themselves needed straight line quilting, since there was already so much swirliness going on. And that's it!

Be sure to look at my previous post for pics of the quilting detail.
The pattern is available on Craftsy and Etsy and is actually a fairly quick project since it's "just" a table runner and not a whole quilt.

Friday, January 27, 2017

Spring Shawl

If you follow me on Instagram, you will have seen this one already. I thought I'd add a couple of extra photos.
Spring Shawl
The pattern is the "Spring" shawl by Bernadette Ambergen. I have used one of her patterns before and loved it. I love this one too. I'm not an overly experienced crocheter. This looks harder than it is.

I was, once again, amazed by the difference blocking can make.

Here is the shawl before blocking, all curly and too small:
Spring Shawl
I blocked it by getting it really wet,
Spring Shawl
rolling it in a towel to get as much of the moisture out as possible,
Spring Shawl
Spring Shawl
and pinning it down in the correct shape and size.
Spring Shawl
Voila!
Spring Shawl
Spring Shawl

Thursday, January 26, 2017

Just in Time for Valentine's Day

After weeks and weeks of development, it's finally here! The Heart to Heart Valentine's Table Runner Pattern.
I wanted to design something a little sophisticated and less cute-sy. Something for my dining table. (Because of the lack of light today, I took these photos on the coffee table downstairs, however.) Heart to Heart Valentine's Runner
Originally the quilting was going to be really simple but then it took on a life of its own...
Heart to Heart Valentine's Runner
As part of keeping it modern, I decided that I didn't want to put a binding on it. I wanted it to look like a runner, not a quilt.
Thank you for the wonderful facing tutorial, Victoria!
Heart to Heart Valentine's Runner
It was a little more involved than binding, but the result is wonderful. Heart to Heart Valentine's Runner
Here's the back. Almost whole cloth-like, isn't it?
Heart to Heart Valentine's Runner
Can you tell I'm really happy with how this turned out?

Monday, January 9, 2017

And Another One!

I think I've finally determined the perfect size for the 1 Hour Baskets to be used at our quilt retreat.


I cut this one at 10.5" x 12.5".
I used fusible fleece for the basket and stiffened the handles up with Pellon Decor Bond.

One down, seven to go.

Oh, and we're also making bunnies out of folded fat quarters.

Thursday, January 5, 2017

A Magical "Burrito" Pillowcase

I had a couple of spare minutes yesterday, as well as a couple of charity pillowcase kits from my guild, so I decided to whip up a magical "buritto" pillowcase quickly, using the very popular tutorial from the website. I hadn't made one in years, so I'd forgotten how easy it is.

Fabric for these pillowcases is donated by guild members, which unfortunately means it's usually fabric nobody wants. The ladies on the giving committee do an excellent job matching up fabrics as best they can. It's kind of like an ugly fabric challenge.

I swapped out the trim fabric for yellow from my scrap bins on this one but that's all.

The tutorial teaches you how to do French seams so there's not a raw edge in sight!
It turned out really cute and I know someone will love it!

Wednesday, January 4, 2017

1 Hour Basket #2

I'm working on an idea for our guild's retreat in April and the original 1 Hour Basket is a little too big for what we have in mind.
I decided to make a smaller one.


I think this one is too small. Darn! I used fusible fleece for this basket. And interfacing in the handles to stiffen them up a bit.

I cut the fabric 10.5" x 10.5" instead of 10.5" x 16.5".

The fabric is Lilac Bunnies & Carrots from Free Spirit and Lime Le Creme Dots from Riley Blake, both available on the website.

Trying again, 3rd time's the charm, right?

1 Hour Basket #1

I've seen 1 Hour Baskets all over the web for the last year or so and today I decided to give it a whirl.
As usual, I didn't have all of the supplies called for in the pattern, but I forged on anyway.

I think it turned out quite nicely all considered. I used Pellon Decor Bond instead of fusible fleece. It's pretty sturdy but did not like being squished through a 3" hole to turn the basket inside out. I think I'll look for something else for the next one.


I also did not use decor weight fabric because all my cute fabric is quilting fabric.

The pattern is really easy to follow and the basket took exactly 1 hour and 2 minutes to make!

The fabric I used is Pink Bunnies & Carrots from Free Spirit's Garden collection & Riley Blake's Small Le Creme Dot in Pink, both available in the store.

Since I made a Halloween item yesterday and an Easter item today I'm well on my way to having all the holidays covered!

Tuesday, January 3, 2017

UFO Challenge #6 Done and Plans for January

Yesterday I finished my January project for the UFO Challenge. Granted it was a small one - 16"x16" - and all it needed was quilting and binding, but it was a good start to the year.


The pattern is my "Skully" block. I enlarged it to 9" to fit my instructions for a mini quilt or pillow cover which you can find over here.

Now on to the rest of the month! I'm hoping to finish my Mariner's Compass quilt this month and get the pattern written. And that's about all since this is a huge project!
Here's another sneak peek.
What are your plans for January?

Sunday, January 1, 2017

UFO Challenge 2017

Happy New Year everyone!

This year I'm planning to make a dent in my UFO pile. Actually, I'm hoping to finish most of them but I don't want to say that out loud...

In order to help me do this, I've joined the UFO Challenge over at allpeoplequilt.com.

Want to join me?

You basically make a list of 12 UFOs you'd like to finish/work on and they'll pick one for you each month.

Here's my list:
1. Dear Jane - still...
2. The Splendid Sampler - lots of catching up to do
3. Mariner's Compass
4. Mini Grandmother's Flower Garden
5. Daisy Chain Hexie Quilt
6. Skully Mini Quilt
7. Rainbow Jane
8. Paula Vaughn A Quilt for All Seasons Cross Stitch - March
9. Christmas Runner - Mod Ornaments from Sew Kind of Wonderful
10. Dog Charity Quilt
11. New Project - still to be determined (I ran out of UFOs!)
12. New Project - Still to be determined

January's pick is #6, so I'll be working on the Skully Mini. It's tiny, so I can probably finish it in one day. Yay!